Proper management of secrets, such as passwords, API keys, and certificates, is crucial for system security. In distributed environments and cloud deployments, mishandling sensitive information can lead to security breaches, data leaks, and severe consequences.
Traditionally, secrets have been stored in configuration files or code repositories, but this practice is insecure and difficult to maintain, especially when managing multiple environments and teams. The need to centralize and protect this data has driven the development of specialized secret management tools.
In this context, tools like HashiCorp Vault provide a viable solution by centralizing the lifecycle management of secrets. This enables development and operations teams to focus on innovation without compromising security.
I will explore fundamental concepts of secret management with HashiCorp Vault, its architecture, and best practices for implementing a secure and scalable system. Additionally, it will cover strategies for accessing secrets (direct queries vs. caching mechanisms) and provide practical integration examples across different programming languages.
A secret refers to any sensitive data that needs to be protected from unauthorized access. This can include, but is not limited to:
Credentials: usernames and passwords.
API keys: keys that allow access to services or applications.
Tokens: temporary or session credentials that authorize specific operations.
Certificates: files or keys used to encrypt communications.
Encryption keys: fundamental elements for encrypting and decrypting information.
The importance of a secret lies in its ability to allow or restrict access to critical resources. Due to their sensitive nature, managing them in a centralized and secure manner is essential, ensuring that only authorized people or applications can access them.
What is Vault?
Vault (HashiCorp Vault) has positioned itself as a robust and flexible tool for centralized secret management. It allows secure storage and policy-based access control. It is a comprehensive secret management tool designed to provide secure, centralized storage of sensitive information and detailed control over who can access it and how. Its main features are:
Secure Storage: stores secrets (such as passwords, certificates, tokens, API keys, etc.) in an encrypted store, ensuring that sensitive information remains protected from unauthorized access.
Access Control: manages access permissions through policies, tokens, and authentication methods. Based on an identity and authorization management system, this allows you to precisely define who can access each secret and under what conditions.
Audit: records all operations performed on secrets, facilitating auditing and compliance with security requirements. Each access, modification, or access attempt is logged, allowing system activity to be tracked.
Rotation and revocation: allows periodic rotation of keys and immediate revocation of compromised access. This minimizes risks if any secret is compromised, as they can be dynamically updated or invalidated without affecting the system’s overall security.
RESTful API: this API exposes a standard REST-based API, which facilitates integration with applications and services developed in any programming language. This API allows authentication, reading, writing, and secret management operations to be performed simply and uniformly.
Vault presents itself as an identity-based encryption and secret management system. This means that robust authentication and authorization methods strictly control secret access, guaranteeing secure, auditable and restricted access. An additional advantage of Vault is that it is free software (initially under a BSL license and currently under an MPL – Mozilla Public License 2.0 license). The source code can be consulted in the following GitHub repository: https://github.com/hashicorp/vault/.
How does it work? 🧬
HashiCorpVault is a server that stores encrypted secrets. Secrets are organized into “backends,” which can be databases, file systems, or external services. Access to secrets is controlled by “policies” that define who can read, write, or modify each secret. Additionally, Vault keeps a detailed log of all activities, making auditing and compliance easier.
In Vault, the initialization process generates what are known as the “unseal keys“, which are essential to protect the “master key” that encrypts all stored secrets. These keys are generated using Shamir’s Secret Sharing algorithm and, by default, Vault splits the master key into 5 parts (or keys) with a predefined threshold (e.g. 3 out of 5). This means that at least 3 of those 5 keys are required to reconstruct the master key and, therefore, to “unseal” (unlock) Vault and allow its normal operation. Key aspects are:
Shamir’s Secret Sharing: this algorithm allows the splitting of a secret (in this case, the master key) into several parts, such that only a minimum number of those parts (the threshold) is sufficient to reconstruct the original secret. In the default Vault‘s configuration, 5 parts are generated and the threshold is 3.
Unseal Process: upon initialization, Vault is in a sealed state. For Vault to operate and decrypt information, the unseal process, in which unseal keys are entered, is required. Once the threshold is met (e.g., 3 keys are provided), Vault rebuilds the master key and “unseals” or unlocks it, allowing access to the secrets.
Distribution and Security: the split into five keys and the requirement for a multiple threshold ensure that no one person or entity has exclusive control over access to Vault. This encourages separation of responsibilities and reduces the risk that a single security error or compromise will expose all information.
Key Management: the unseal keys must be stored securely and distributed among trusted operators. Losing or mishandling these keys can prevent Vault from unlocking, preventing access to data, or, in the worst case, compromise system security.
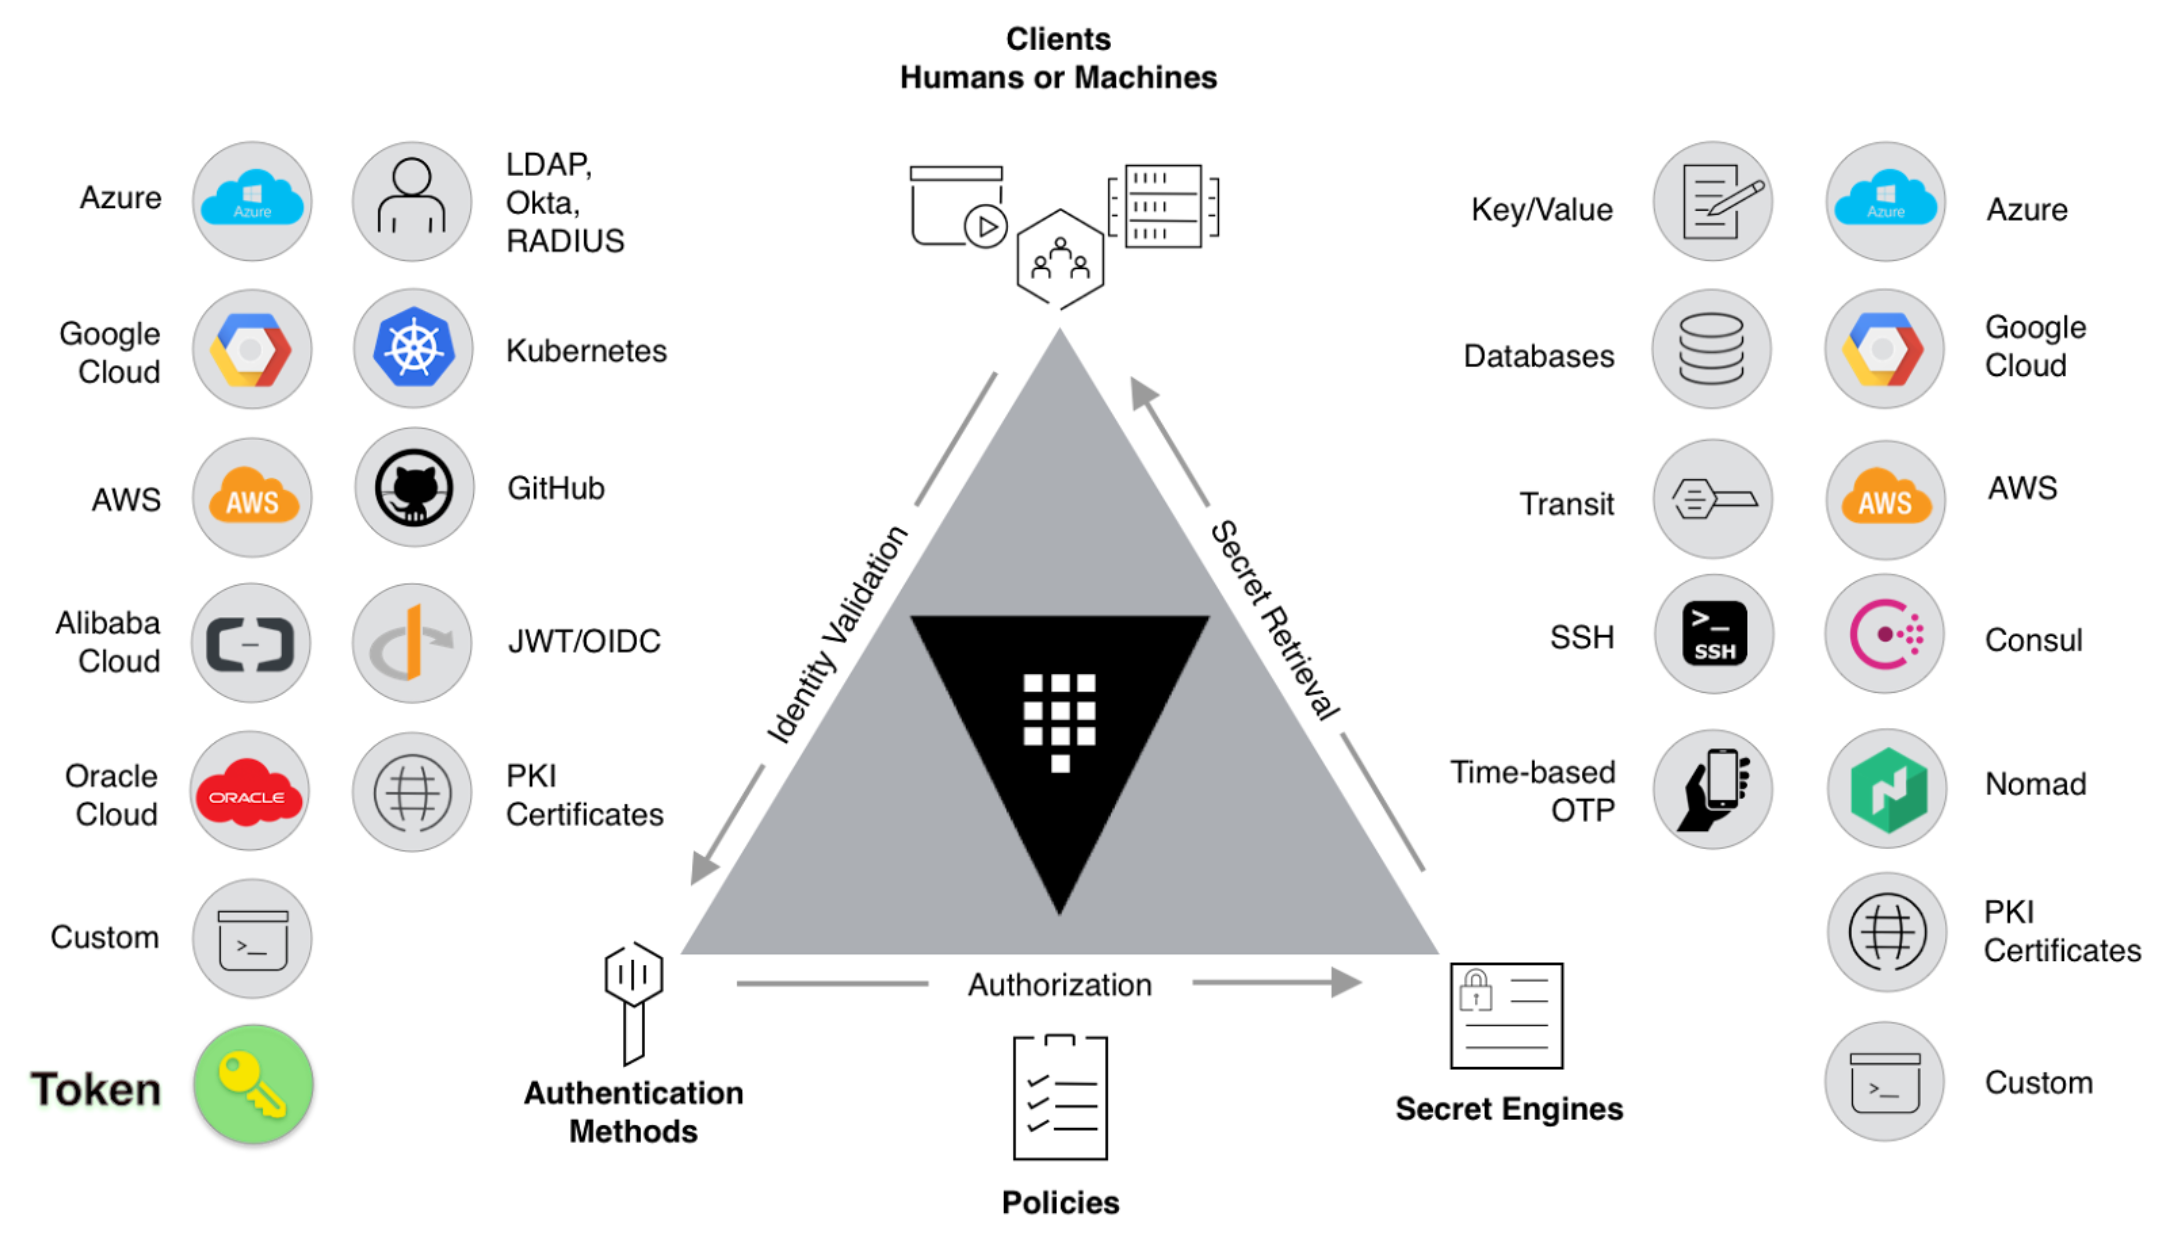
Specifically, Vault is divided into several sections:
Vault Server: central point that stores and manages secrets.
Agents and Clients: applications and services communicating with Vault to request secrets.
Authentication Modules: allow integration with various methods (tokens, LDAP, AppRole, etc.).
Secrets Backend: modules that manage different types of secrets (KV, certificates, dynamic tokens, etc.).
RESTful API: a read, write, authentication and administration protocol.
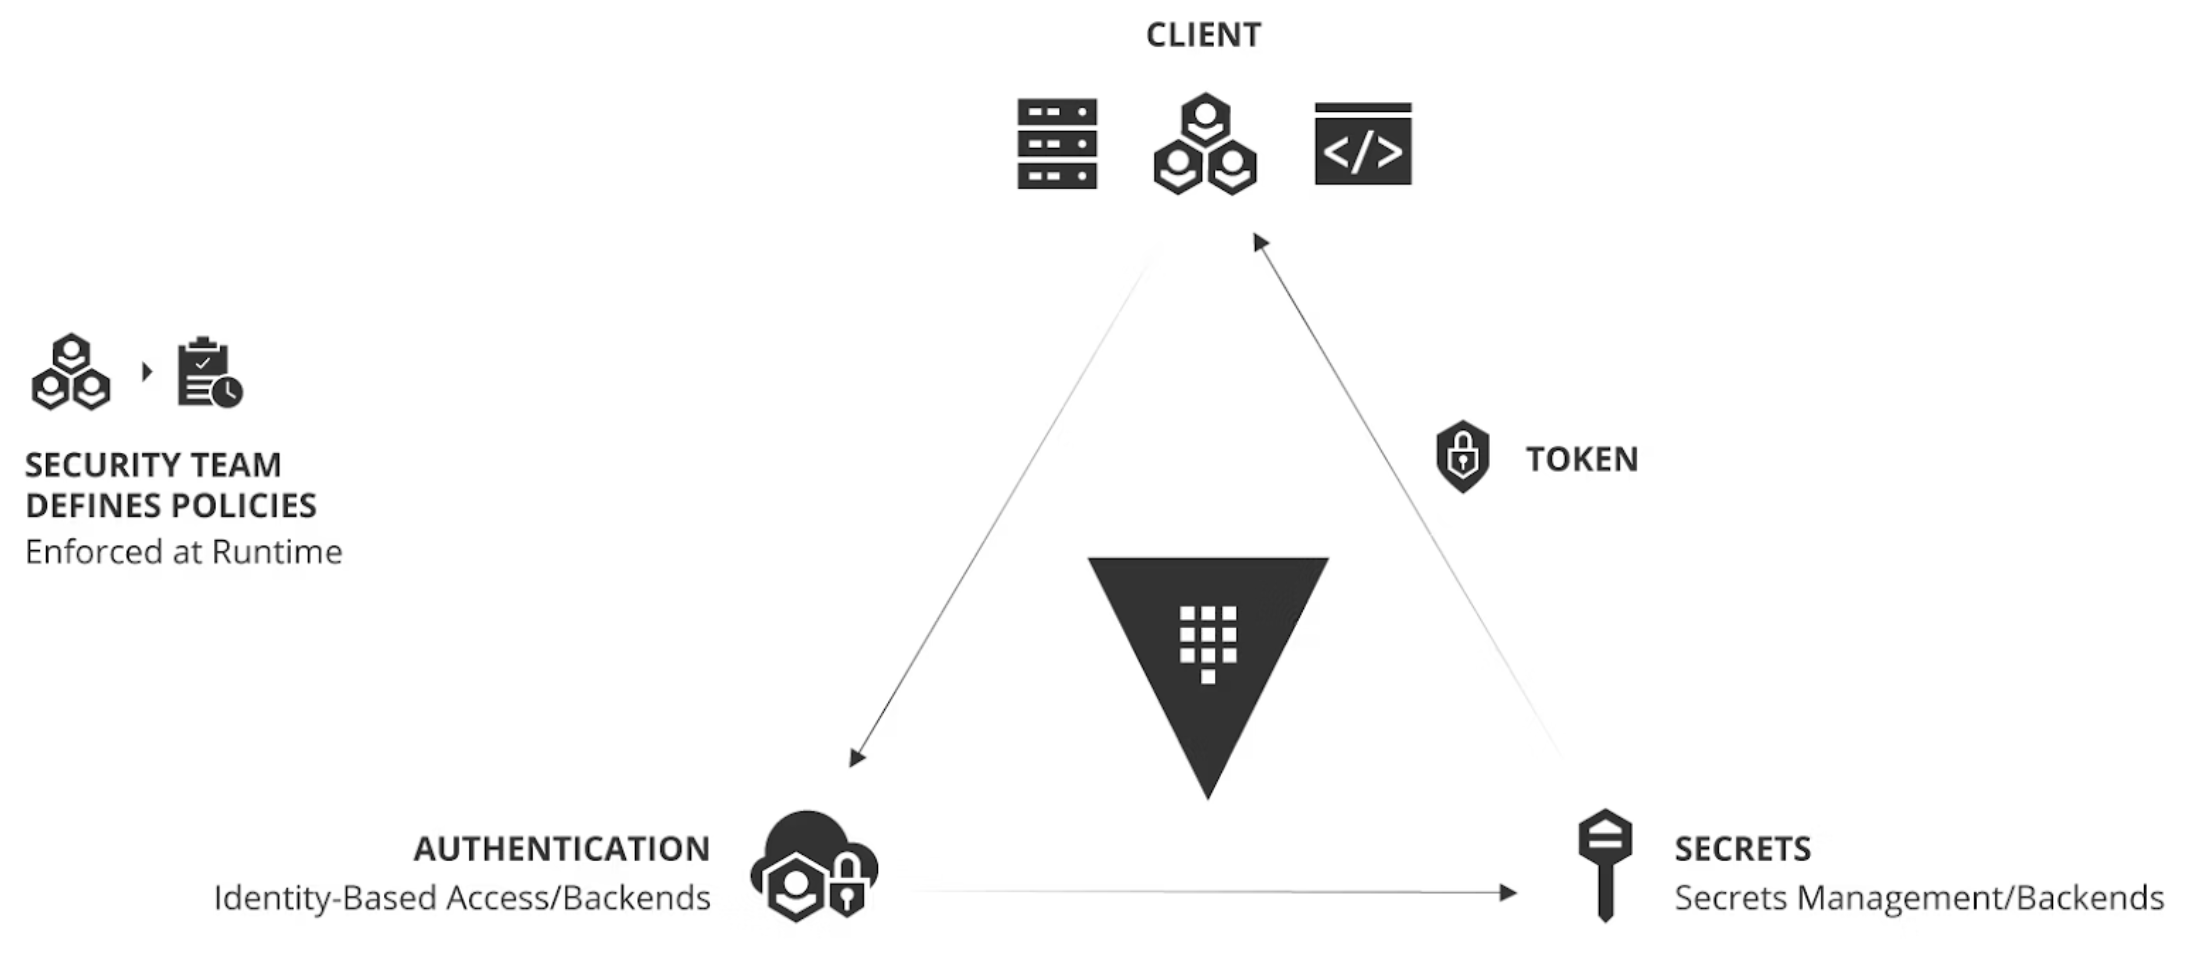
When obtaining secrets in an application, the steps that are followed are:
Authentication: the application authenticates itself to Vault using a configured method (for example, a token or AppRole).
Request for Secrets: once authenticated, requests are made to the API to read or write secrets.
Validation and Response:Vault validates the request and returns the requested information or confirms the operation.
Lifecycle and Caching: it is evaluated whether secrets should be requested in each request or cached in memory, taking into account expiration and security policies.
Quickstart 🚀
The easiest way to experiment with Vault is to deploy it with Docker, for this example we are using Ubuntu 22.04 with: Docker version 26.1.3, build 26.1.3-0ubuntu1~22.04.1
To start Vault we create a file named “docker-compose.yaml” that will contain:
# Start the container
$ docker compose up vault

# At the end you will see the following:
...
vault | WARNING! dev mode is enabled! In this mode, Vault runs entirely in-memory
vault | and starts unsealed with a single unseal key. The root token is already
vault | authenticated to the CLI, so you can immediately begin using Vault.
vault |
vault | You may need to set the following environment variables:
vault |
vault | $ export VAULT_ADDR='http://0.0.0.0:8200'
vault |
vault | The unseal key and root token are displayed below in case you want to
vault | seal/unseal the Vault or re-authenticate.
vault |
vault | Unseal Key: E878WqalQNuN3Kka34wU8QF1j1Vem1njzI+OZUGGDWc=
vault | Root Token: root
vault |
vault | Development mode should NOT be used in production installations!
vault |
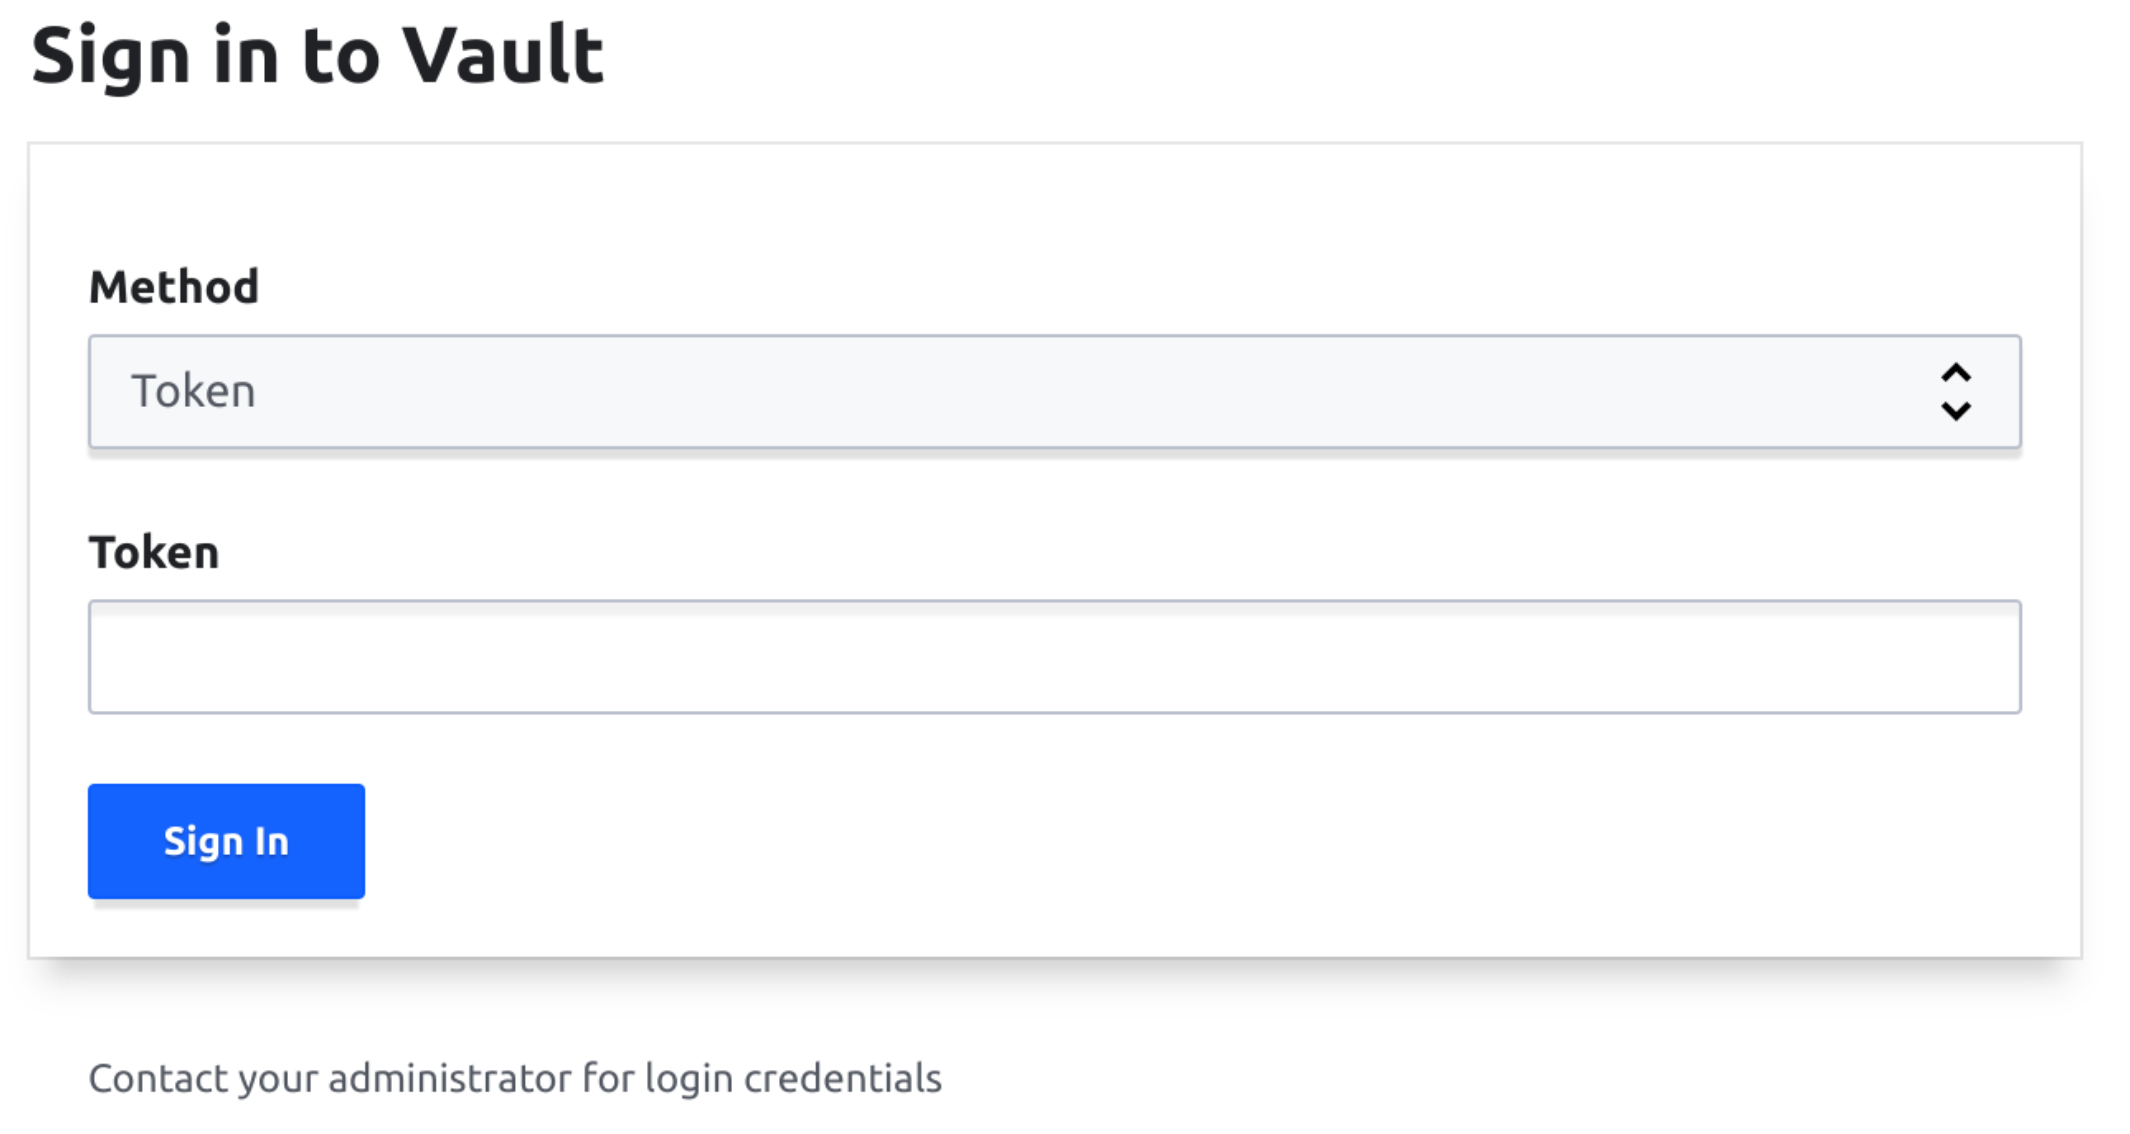
The system will remain in “standby“, that is, it is booted. For correct operation we will make sure that the Root Token is “root“, this will be the master password (Master Key) of Vault and will give us access to all tokens. From a development point of view or to test Vault is the best option. In a production deployment the server will have a more complex structure (5 unseal keys), but this will not affect the developer in any way, who will continue to operate in the same way (using a token provided by the Vault administrators that will give access exclusively to the secrets protected by that token). To verify that everything is correct, you can visit the URL: http://127.0.0.1:8200/ which will show us the Login screen in the browser:
The access token is “root” to be able to log in.
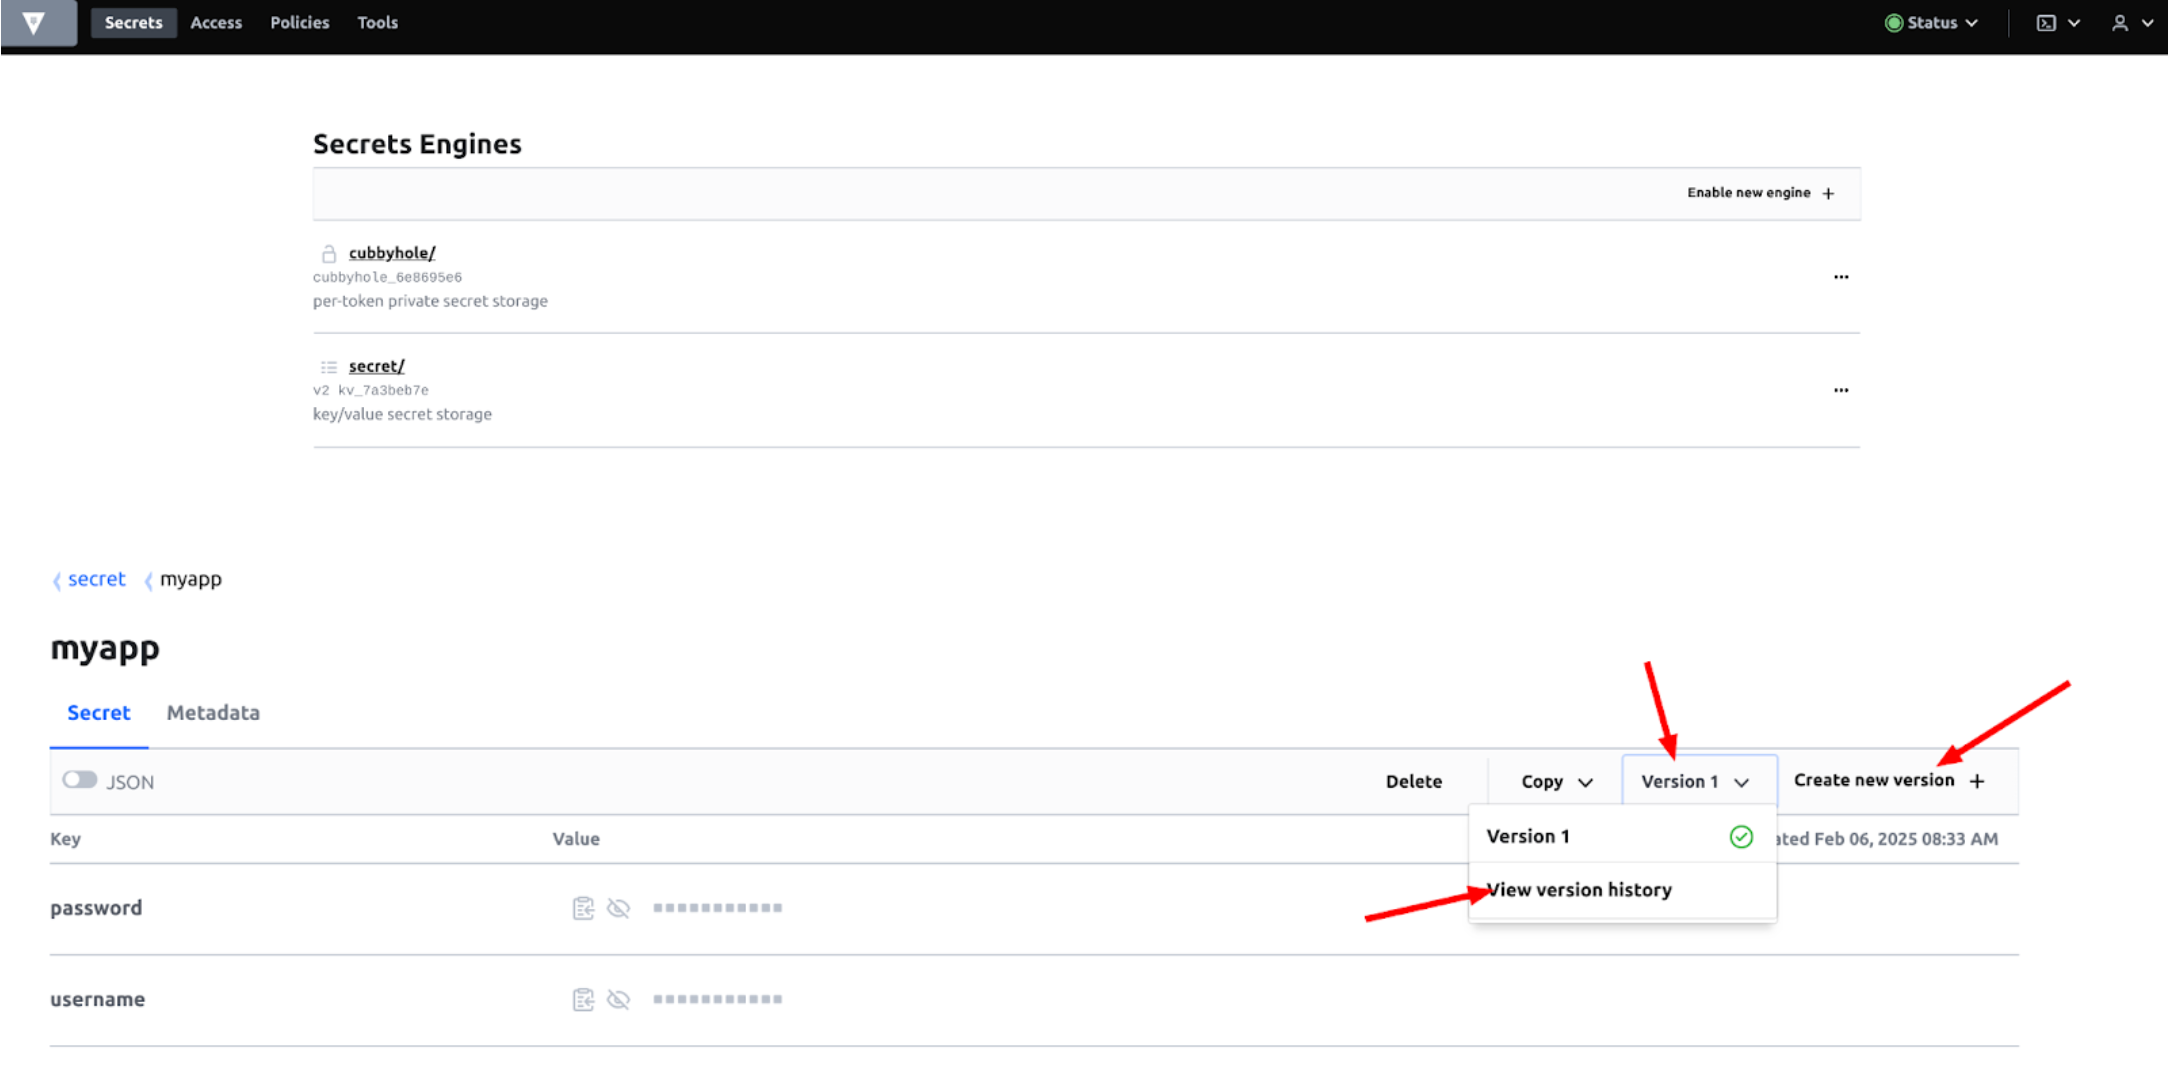
Vault comes with plenty of features:
Token versioning
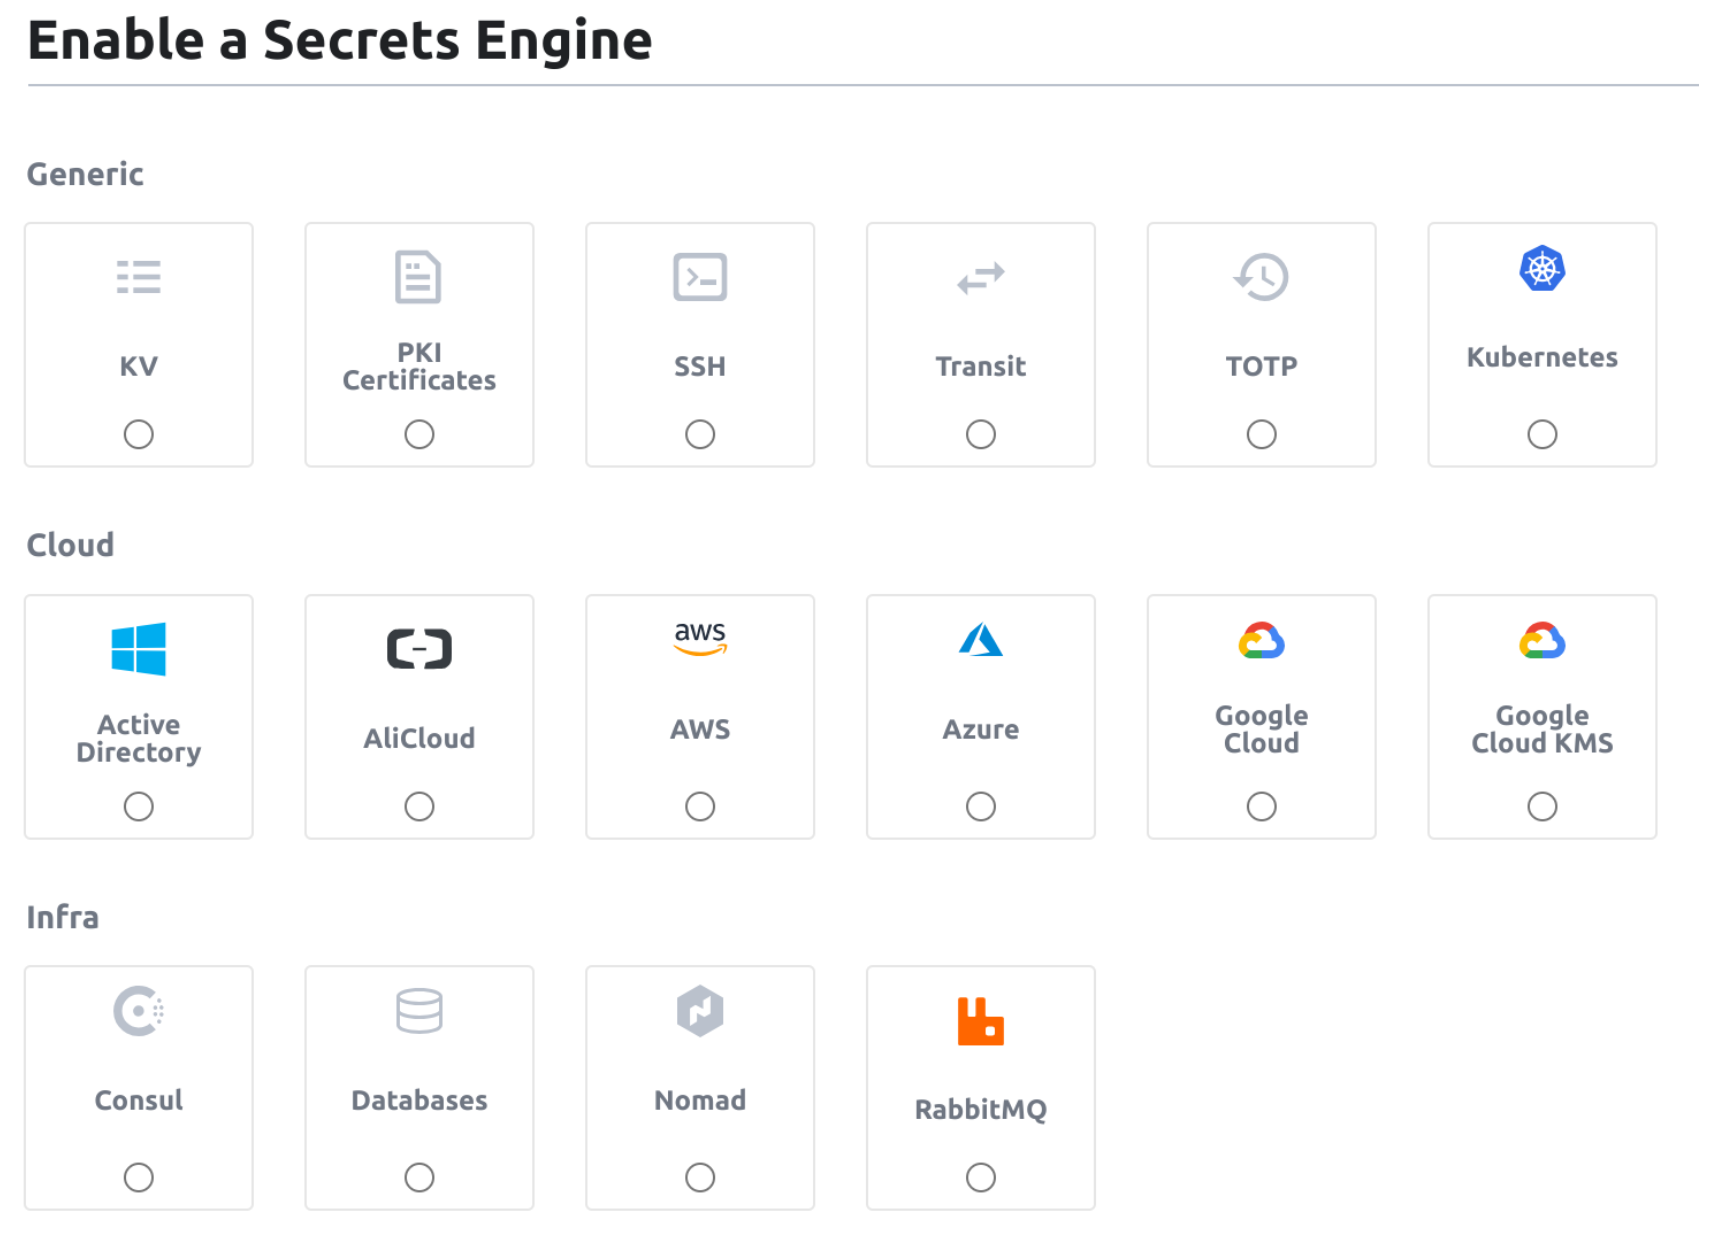
Several secret engines
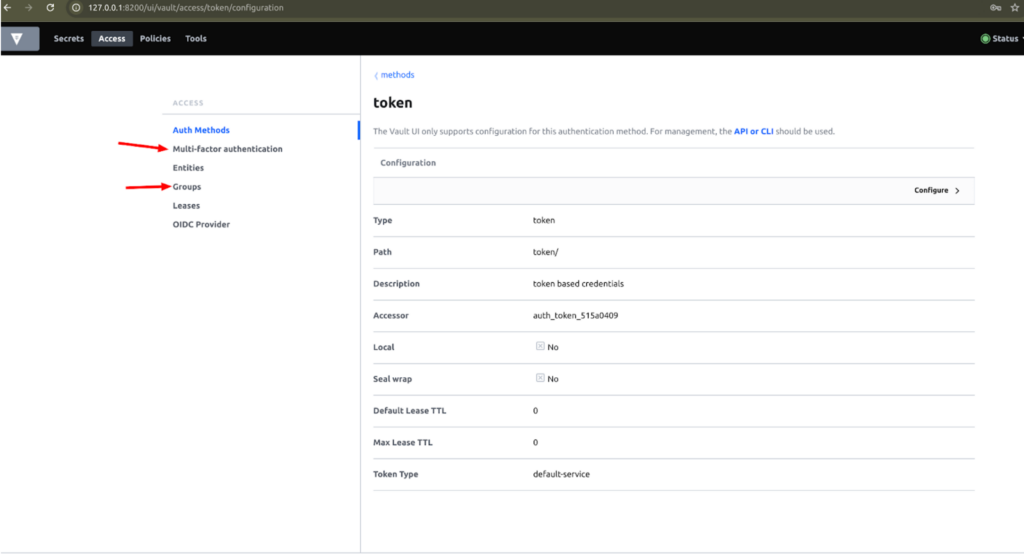
Groups and Leases
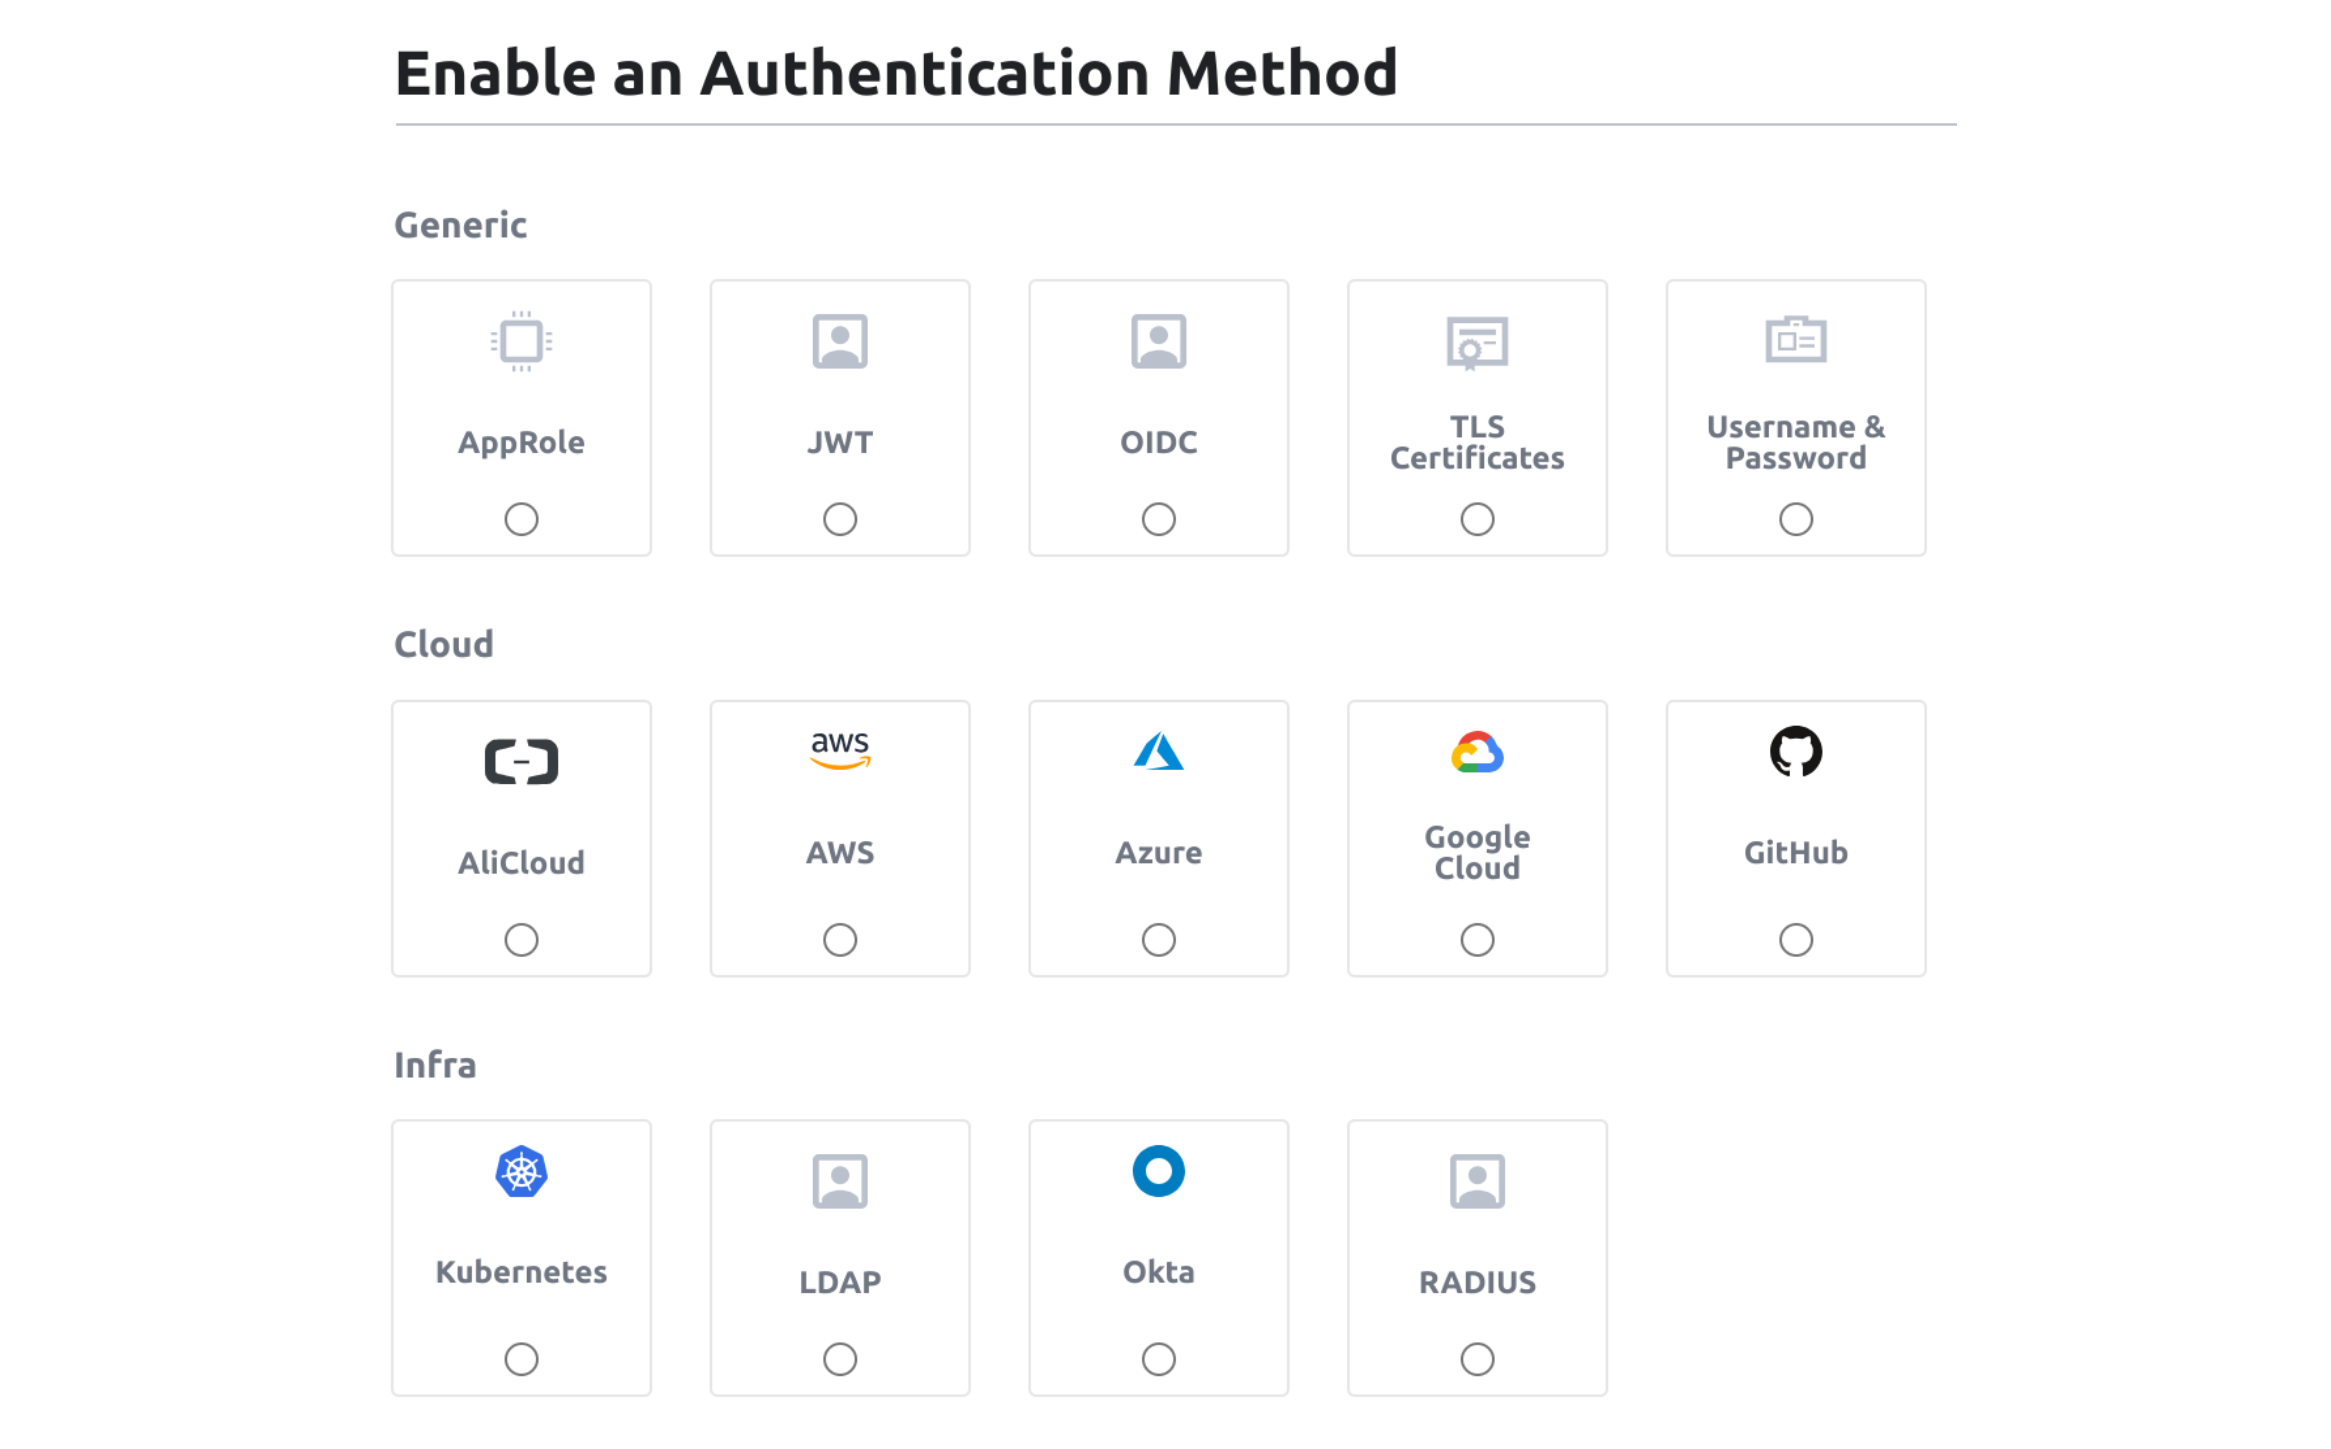
Several authentication methods
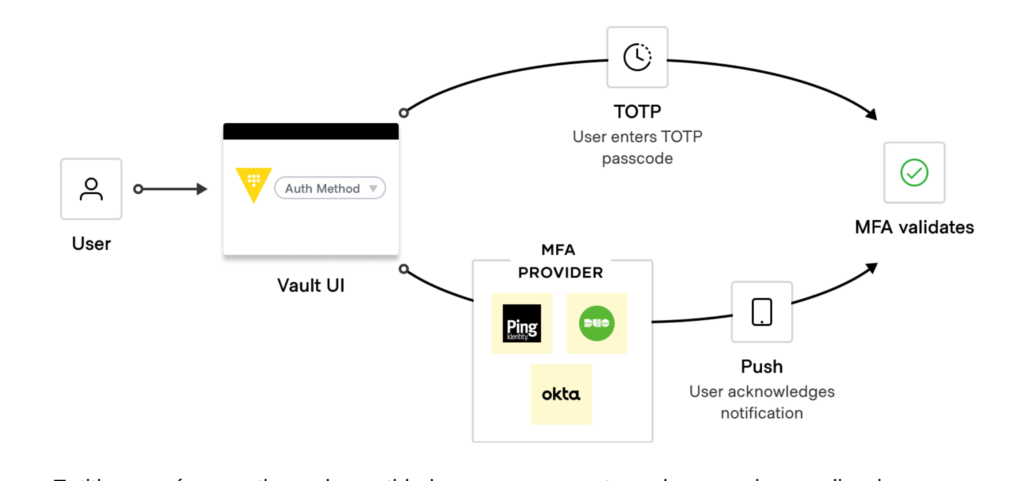
Multi-Factor Authenticaion (MFA)
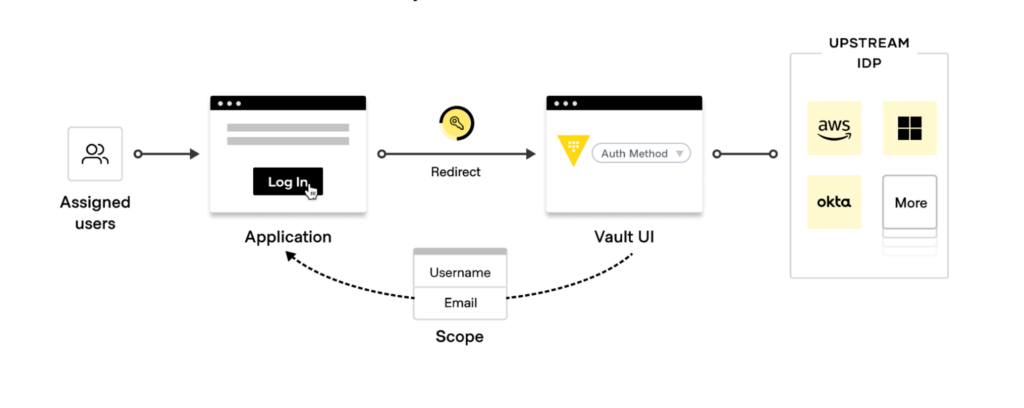
OpenID Connect Provider
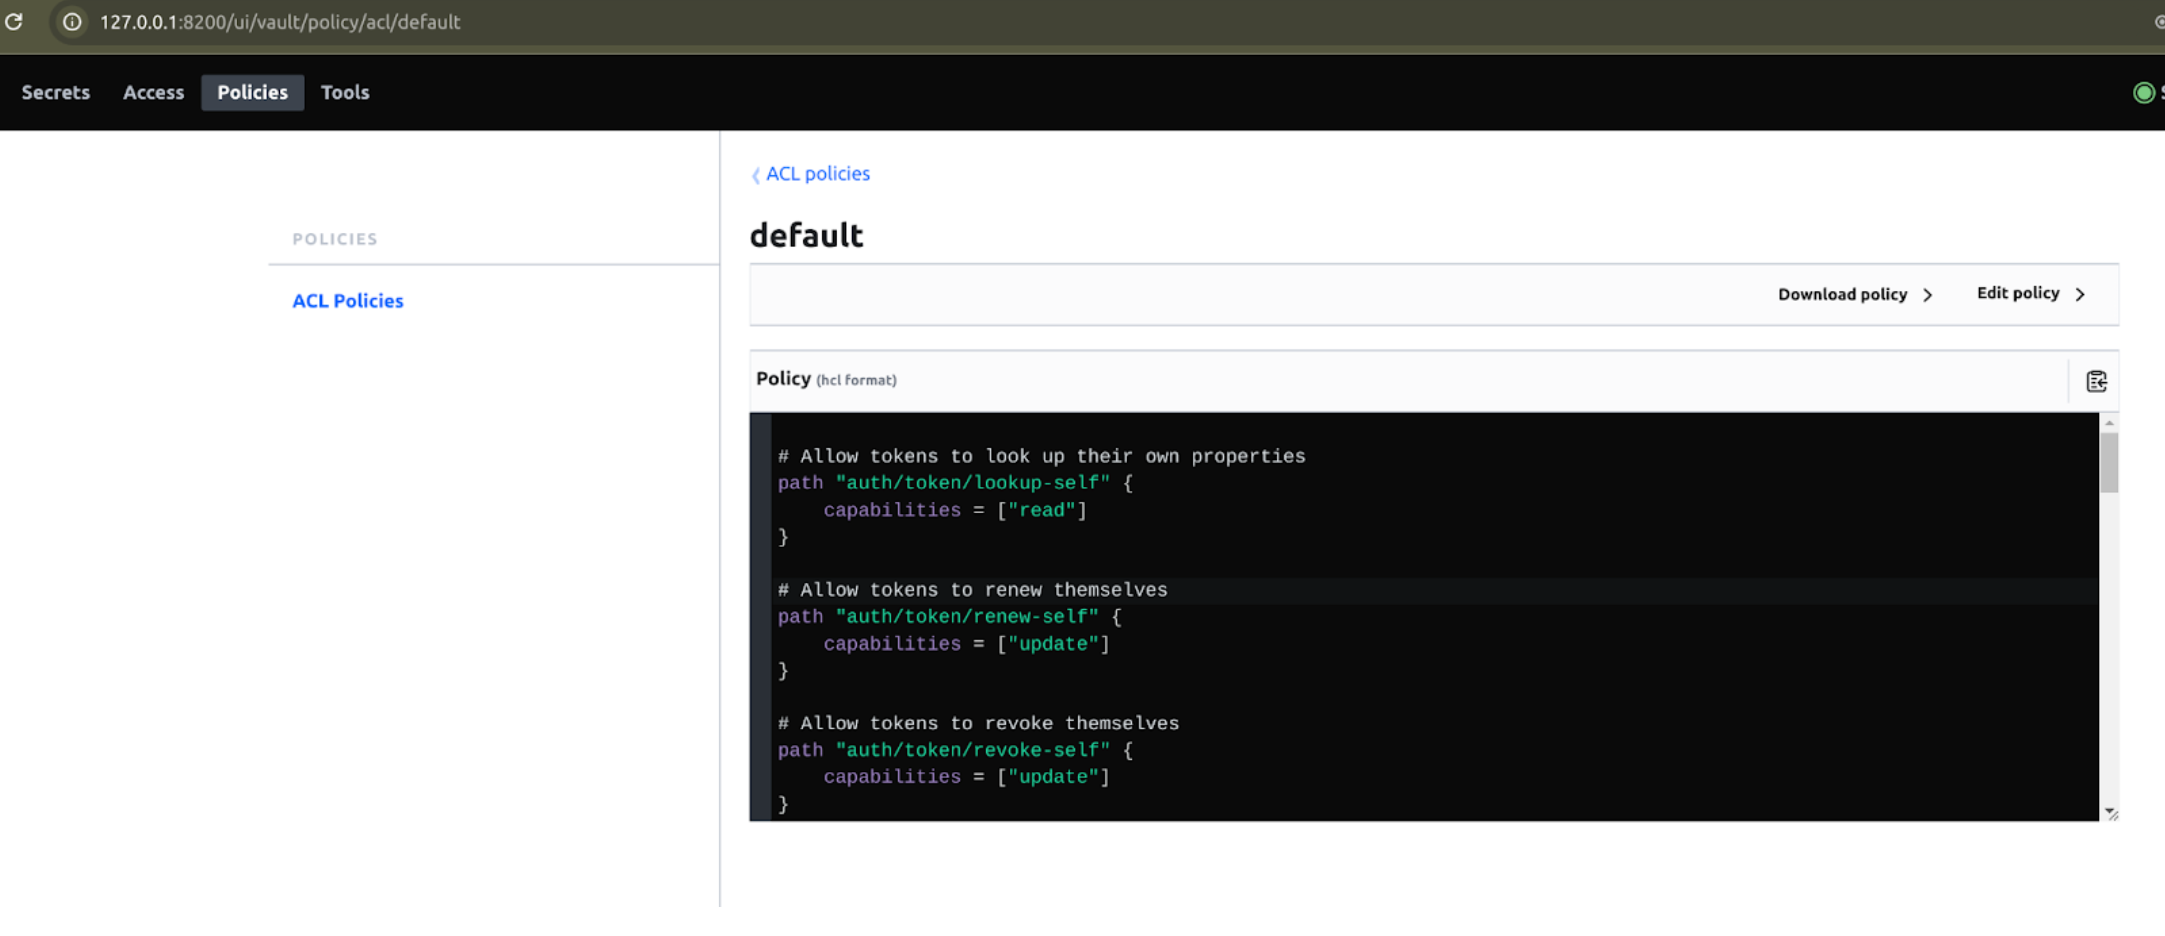
It is possible also to define your own policies:
An example written in HCL would look like:
# This block defines permissions to access all secrets
# within the path "secret/data/myapp" and its subpaths
path "secret/data/myapp/*" {
  capabilities = ["read", "list"]
}

# This block allows write operations on the exact path
# "secret/data/myapp". Creating, updating, deleting, and reading the
# secret are allowed
path "secret/data/myapp" {
  capabilities = ["create", "update", "delete", "read"]
}

# This block allows the authenticated user to lookup the details
# of their own token
path "auth/token/lookup-self" {
  capabilities = ["read"]
}
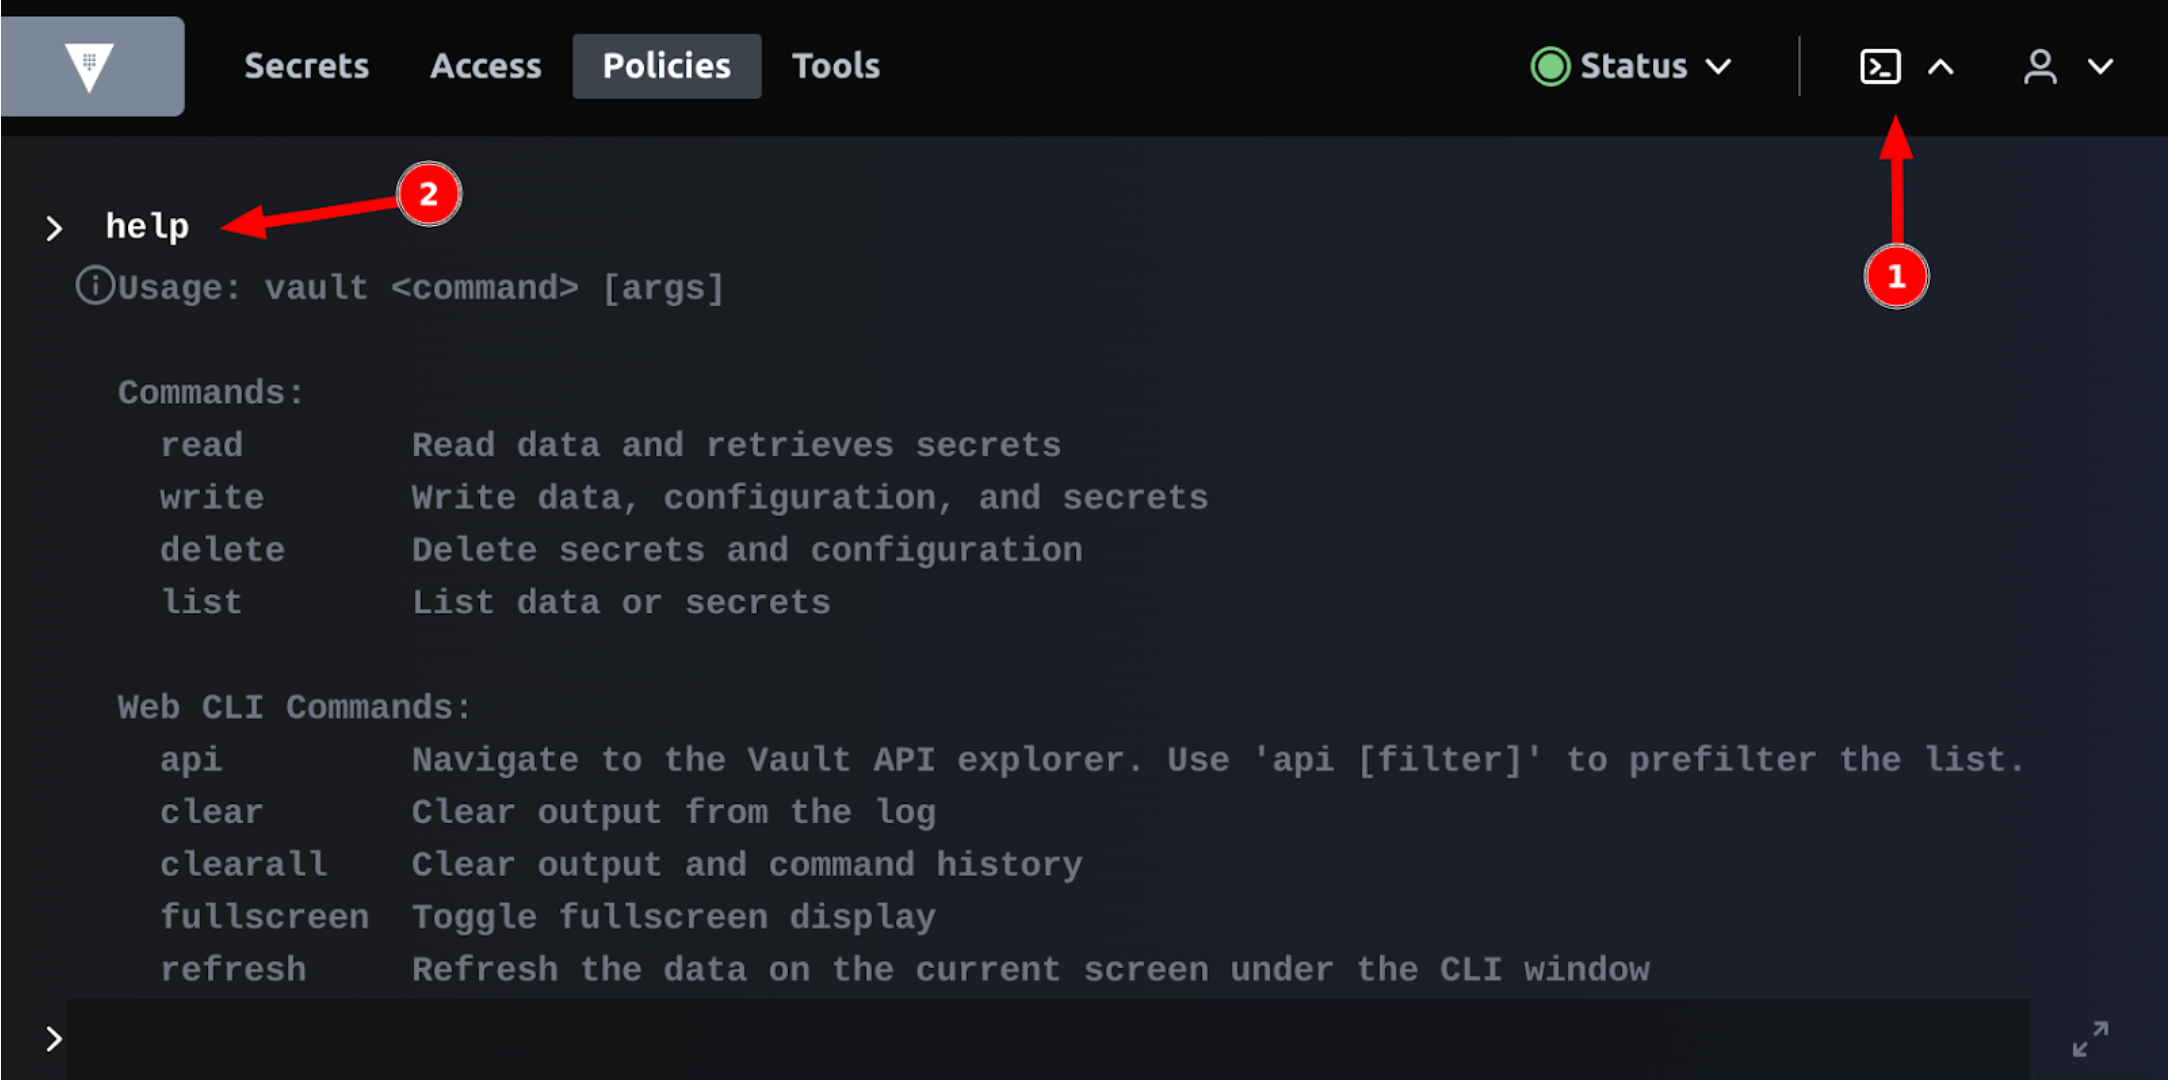
It also provides a shell ready to use in the admin panel:
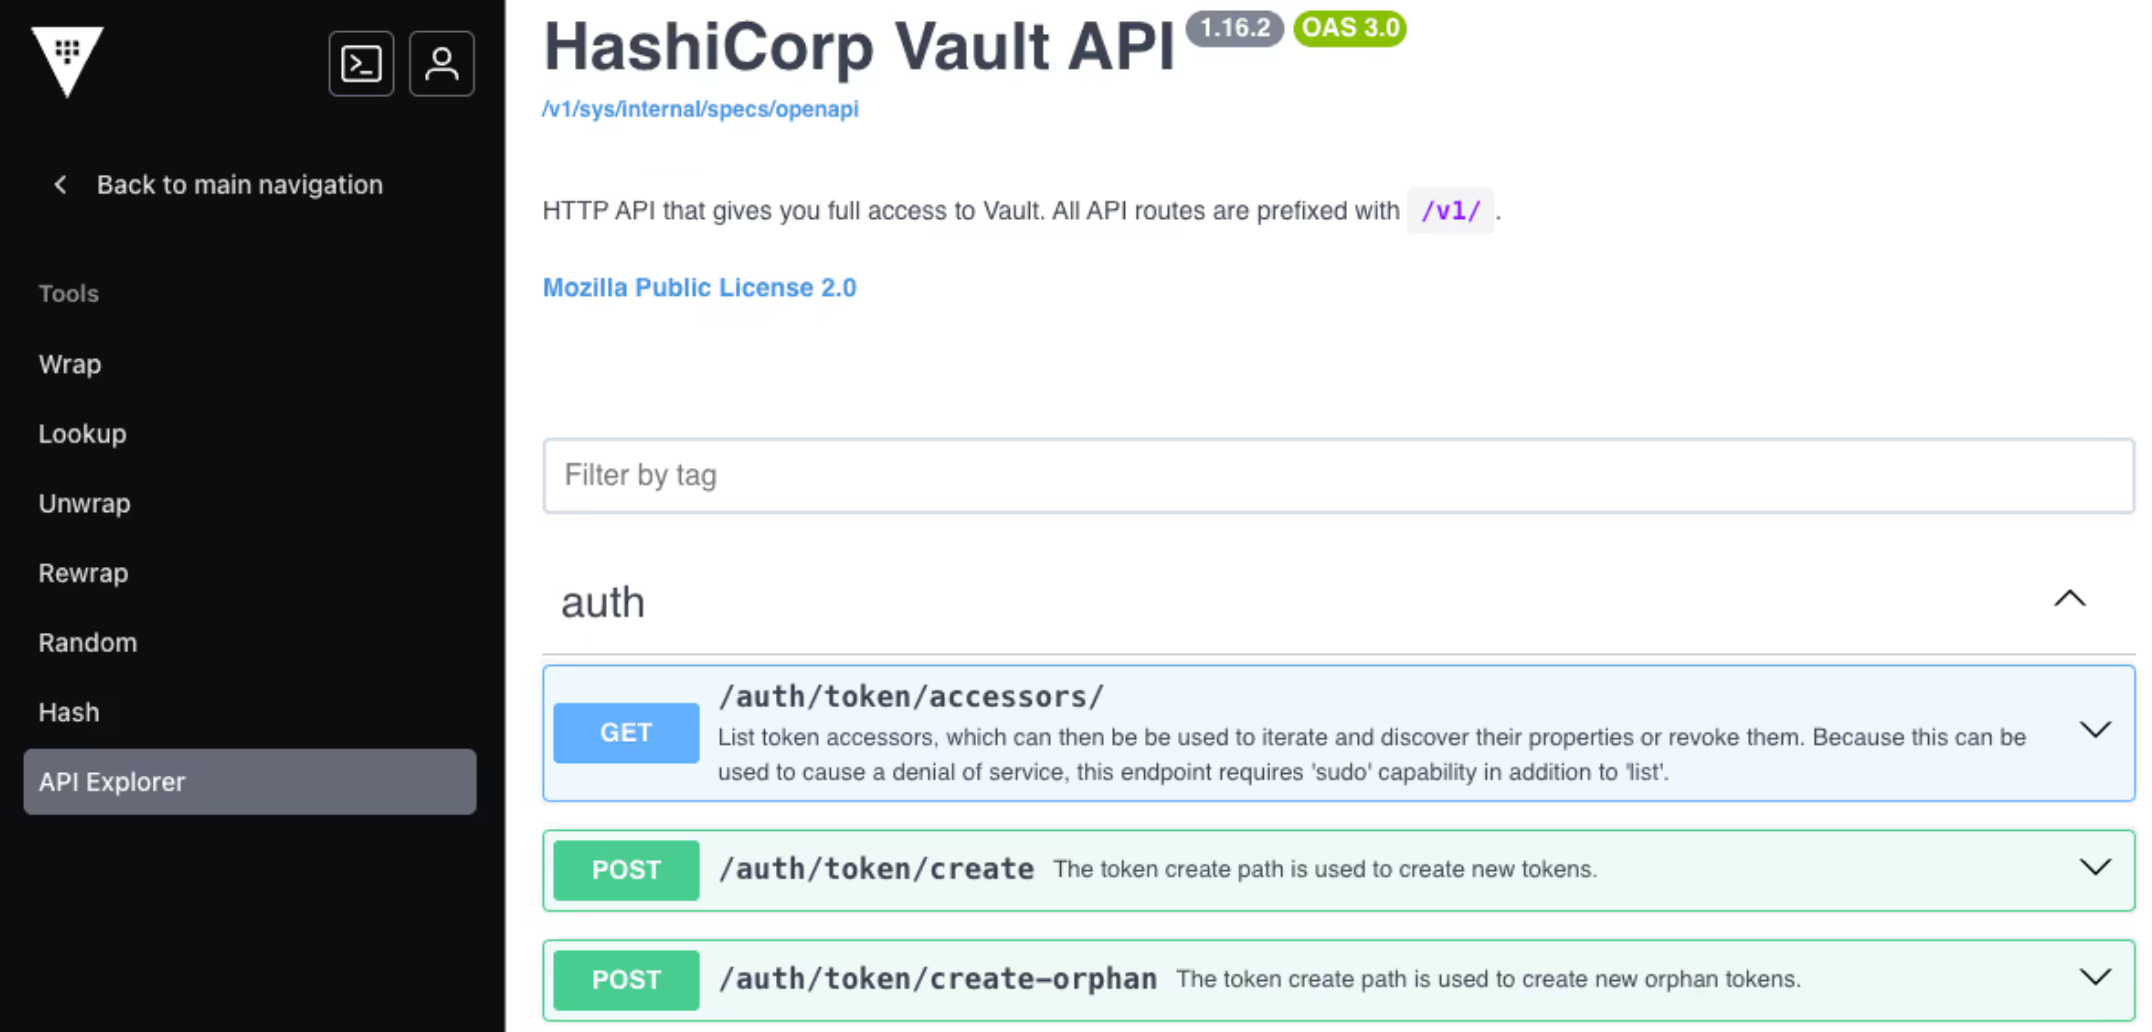
Vault also provides a REST API that can be used from any programming language:
The primary operations included in the RESTful API are:
Authentication: obtaining a token via various methods (e.g., POST /v1/auth/token/create).
Reading and Writing Secrets: operations such as GET /v1/secret/data/<path> for reading and POST /v1/secret/data/<path> for writing.
Policy Management and Auditing: configuring and monitoring access.
The API uses JSON for data exchange and requires that each request be authenticated (except for those intended to obtain the initial token).
The most common actions are:
Authentication: the credential is sent to the corresponding endpoint and a token is received.
Reading Secrets: the application sends a GET request with the token in the header (X-Vault-Token).
Writing/Updating: the data is sent in JSON format using a POST or PUT request.
A well-documented API facilitates integration with any language that can make HTTP requests.
Practical examples
#
# === Python ===
#
# You need to install hvac with: pip install hvac requests
# The example assumes that the secret is stored in the KV engine version 2 at
# the path secret/data/myapp (the KV engine already exists by default in our
# container)

import hvac

# Configure the URL to Vault and the token
VAULT_ADDR = "http://localhost:8200"
VAULT_TOKEN = "root"

# Initialize the Vault client
client = hvac.Client(url=VAULT_ADDR, token=VAULT_TOKEN)

# Verify Vault status
if client.is_authenticated():
    print("[✔] Sucessfully connected to Vault!")
else:
    print("[❌] Authentication error!")
    exit(1)

# Path to store the secrets
secret_path = "secret/data/myapp"

print("[✔] Saving a secret...")
client.secrets.kv.v2.create_or_update_secret(
    path="myapp",
    secret={"username": "admin", "password": "supersecret"},
)

print("[✔] Read a secret...")
read_response = client.secrets.kv.v2.read_secret_version(path="myapp")
print(f"Stored secret: {read_response['data']['data']}")

print("[✔] List secrets...")
list_response = client.secrets.kv.v2.list_secrets(path="")
print(f"Secretos disponibles: {list_response['data']['keys']}")

# print("[✔] Remove a secret...")
# client.secrets.kv.v2.delete_metadata_and_all_versions(path="myapp")
# print("[✔] Done! Secret removed sucessfully.")
<?php
/*

  === PHP Example ===

  This example uses PHP's cURL function to make a GET request
  You should handle the response and check for possible connection errors

*/

$token = 'root';
$vaultUrl = 'http://localhost:8200/v1/secret/data/myapp';

$ch = curl_init();
curl_setopt($ch, CURLOPT_URL, $vaultUrl);
curl_setopt($ch, CURLOPT_HTTPHEADER, array("X-Vault-Token: $token"));
curl_setopt($ch, CURLOPT_RETURNTRANSFER, true);

$response = curl_exec($ch);
if(curl_errno($ch)){
    echo 'Error:' . curl_error($ch);
}
curl_close($ch);

$data = json_decode($response, true);
echo "Secret Data:\n";
print_r($data['data']['data']);


/*

  The output will look like:

  Secret Data:
  Array
  (
      [username] => admin
      [password] => supersecret
  )

*/
/*

  === C Example ===

  This program requires the libcurl library to be installed
  The WriteMemoryCallback callback is responsible for storing the HTTP response in memory

*/

#include <stdio.h>
#include <stdlib.h>
#include <string.h>
#include <curl/curl.h>

// Structure to store the answer
struct MemoryStruct {
    char *memory;
    size_t size;
};

// Callback function to write the answer into memory
static size_t WriteMemoryCallback(void *contents, size_t size, size_t nmemb, void *userp) {
    size_t realsize = size * nmemb;
    struct MemoryStruct *mem = (struct MemoryStruct *)userp;

    char *ptr = realloc(mem->memory, mem->size + realsize + 1);
    if(ptr == NULL) {
        printf("No hay suficiente memoria (realloc retornó NULL)\n");
        return 0;
    }
    mem->memory = ptr;
    memcpy(&(mem->memory[mem->size]), contents, realsize);
    mem->size += realsize;
    mem->memory[mem->size] = 0;
    return realsize;
}

int main(void) {
    CURL *curl_handle;
    CURLcode res;

    struct MemoryStruct chunk;
    chunk.memory = malloc(1);  /* Inicializa con 1 byte */
    chunk.size = 0;

    curl_global_init(CURL_GLOBAL_ALL);
    curl_handle = curl_easy_init();

    // Prepare the URL endpoint to Vault
    curl_easy_setopt(curl_handle, CURLOPT_URL, "http://localhost:8200/v1/secret/data/myapp");

    // Configure the header with the token
    struct curl_slist *headers = NULL;
    headers = curl_slist_append(headers, "X-Vault-Token: root");
    curl_easy_setopt(curl_handle, CURLOPT_HTTPHEADER, headers);

    // Configure callback to store the answer
    curl_easy_setopt(curl_handle, CURLOPT_WRITEFUNCTION, WriteMemoryCallback);
    curl_easy_setopt(curl_handle, CURLOPT_WRITEDATA, (void *)&chunk);

    // Send the request
    res = curl_easy_perform(curl_handle);
    if(res != CURLE_OK) {
        fprintf(stderr, "curl_easy_perform() falló: %s\n", curl_easy_strerror(res));
    } else {
        printf("%lu bytes received\n", (unsigned long)chunk.size);
        printf("Answer:\n%s\n", chunk.memory);
    }

    // Free resources
    curl_slist_free_all(headers);
    curl_easy_cleanup(curl_handle);
    free(chunk.memory);
    curl_global_cleanup();

    return 0;
}

/*
  We will use the next command to compile the code:
  gcc vault.c -lcurl -o vault

  The output of the program will be:
  344 bytes received
  Answer:
  {"request_id":"455b9ca7-ee7b-f69c-e8d0-51d81e90f976","lease_id":"","renewable":false,"lease_duration":0,"data":{"data":{"password":"supersecret","username":"admin"},"metadata":{"created_time":"2025-02-07T06:47:11.21923619Z","custom_metadata":null,"deletion_time":"","destroyed":false,"version":1}},"wrap_info":null,"warnings":null,"auth":null}

*/
Performance Considerations⚡
One of the key aspects when integrating Vault into an application is deciding how and when to access the secrets.
Accessing Vault on every request vs. In-memory caching
Accessing on every request:
Advantages:
The updated value is always obtained.
Invalidation logic is simplified, since Vault can manage the expiration (TTL) of tokens and secrets.
Disadvantages:
Increases latency on every request.
Can generate a considerable load on the Vault server in high-traffic systems.
In-memory caching:
Advantages:
Reduces latency by avoiding repeated calls to Vault.
Decreases the load on the Vault server.
Disadvantages:
Requires implementing caching logic and expiration control.
There is a risk of using stale secrets if time-to-live (TTL) is not properly managed.
Caching and Security Strategies
Temporary Caching: store secrets in memory for a short period, taking advantage of the TTL configured in Vault. When the cache expires, a new query is made.
Distributed Caching: in environments with multiple instances and the need to manage many different credentials that cannot be loaded into memory, use distributed caching solutions (such as Redis) to centralize the information, maintaining consistency.
Revocation and Rotation: always consider that Vault can revoke or rotate secrets. The system must be able to invalidate the cache in the event of changes or revocations.
We must consider that the use of in-memory caching avoids making calls to Vault in each request. This can improve the performance of the application, but it also introduces security risks if the cache is not managed properly. However, this system is still much more agile and secure than files with secrets.
Store tokens🏅
When programming, storing tokens securely is essential to prevent unauthorized access to Vault. The best practices depend on the environment and security policies, but here are some recommended approaches:
1. Environment Variables
This is the recommended approach for local development:
# Store the token in an environment variable
$ export VAULT_TOKEN="token"
# Access it in your application
import os
vault_token = os.getenv("VAULT_TOKEN")
Pros: easy to configure, avoids hardcoding secrets in source code. Cons: can be exposed in process lists (ps aux), logs, or if the system is compromised.
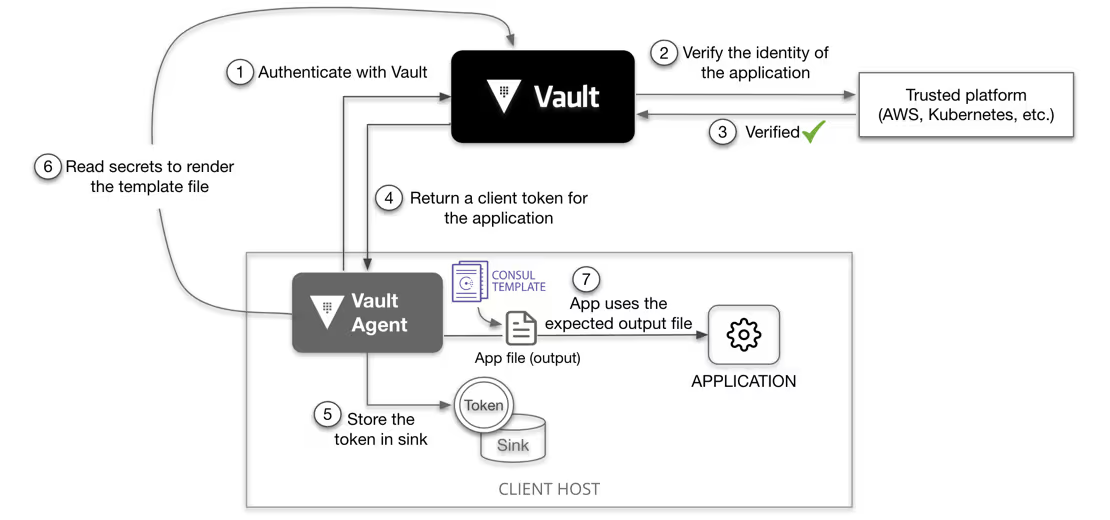
2. Vault Agent with Auto-Auth
Vault Agent can authenticate to Vault and automatically retrieve tokens, reducing the need to manually store them. The token is stored in a response-wrapped file that applications can read.
Pros: no need to store static tokens, authentication is dynamically managed. Cons: requires correct IAM policies and role configurations.
5. Secure File Storage
If can not proceed with the previous options and don’t have any other operational choice, the applications can read from ~/.vault-token securely.
# Store the token in a restricted file
echo "your-vault-token" > ~/.vault-token
chmod 600 ~/.vault-token
Pros: useful for CLI tools. Cons: less secure if file permissions are misconfigured.
What to Avoid?
🚫 Hardcoding tokens in source code 🚫 Committing tokens to version control (e.g., GitHub, GitLab) 🚫 Storing tokens in shared locations with weak access control
References🔗
The integration of Hashicorp Vault into secret management provides a centralized, secure, and scalable solution, adapted to the needs of modern, distributed environments. The availability of a RESTful API facilitates communication from various languages, allowing Vault to be integrated into both legacy systems and new architectures.
The key is to find the balance between security and performance:
Security: ensuring that secrets are updated and handled securely.
Performance: implementing caching strategies when necessary, without compromising the validity of the data.
En primer lugar debemos conocer que para que exista el fichero .ibd debemos tener activado el sistema de almacenamiento Barracuda mediante la separación de ficheros por cada tabla...
🇬🇧 Read it in English, “What is it CODENERIX?“ Es el nombre que recibe el software libre generado por Centrologic para desarrollo de herramientas de gestión...